MSFS2020 Boeing 787 Horizon Full Flight Tutorial Part 1
Table of Contents
Introduction
Welcome to my MSFS Boeing 787 Full Flight Tutorial Part 1, I am using the Horizon mod for this so if you are using the default 787 or other mod, some items may be a little different but you should still be able to follow along.
Part one will deal with everything from power on until we reach cruise, part two will take over from cruise and cover descent and landing.
We are going to begin cold and dark at Hakodate Airport in Hokkaido, Japan. I will go through the start up procedures and show how to enter and check a flight plan, set the performance for the flight and show you my flows and checklists.
Pre-requisites
- Asobo Boeing 787 (MSFS Premium Deluxe version)
- Horizon 787 Mod Download it here
This guide assumes you have a SimBrief account and have also linked your SimBrief id with the aircraft. If you haven’t done that then follow the instructions on this page before continuing.
After take off we will fly to Tokyo Haneda Airport. During the cruise I will show you how I prepare for descent and approach. After Landing we will go through shut down and securing the aircraft.
Running Checklists
During the tutorial, there will be instruction to run a checklist at certain points. These checklists are displayed on the CDU. To start the required checklist, go to your preferred MFD and press the CHKL button. This will open the list of checklists, the desired checklist (depending on your position in the flow) and complete it before moving on to the next. Some checklist items will complete automatically if the conditions they are looking for is set. Some items will require you to tick the box next to it. You can tell a checklist item is complete when it turns green.
Power on From Cold And Dark
Perform Preflight Checklist
Go to the overhead panel, started at the left hand side of the panel, perform the following flow to perform power up.
| Electrical Power Up | |
|---|---|
| Battery Switch | On |
| C1 and C2 ELEC pump Selectors | Off |
| DEMAND Pump Selectors | Off |
| WIPER Selectors | Off |
| Landing Gear Lever | Down |
| Electrical Power | Establish |
Establish the Electrical Power by using the APU or, if available, external power.
Using External Power
| via EXT PWR | |
|---|---|
| EXT PWR AVAIL lights | Illuminated |
| EXT PWR switches | Push |
Using APU
| via APU | |
|---|---|
| APU Generator switches | On |
| APU Selector | Start, then ON |
Pre Flight Procedures
Now we have power to the aircraft let’s begin the pre flight procedures
| Pre Flight | |
|---|---|
| IRS Selectors | Off 30 seconds then On |
| Status Display | Check (No abnormal messages) |
CDU/EFB Pre Flight Procedures
The CDU will default to the IDENT page. Press RTE to open the RTE 1 page.
Pressing the REQUEST button will fetch the latest SimBrief flight plan. Once the plan is available press LOAD and our initial flight plan will automatically be loaded. We still need to insert our departure runway and procedures.
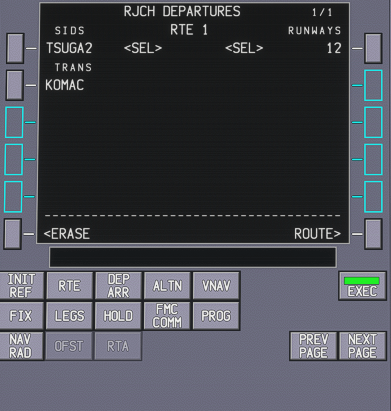
Press DEP ARR and choose the departure runway and SID according to your flight plan.

As we can see from the image, our departure is from runway 12 via the TSUGA2 SID. Press the buttons next to the to select and your departure should be ready and look like this image
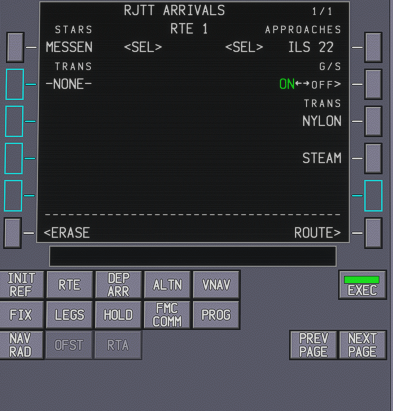
Press the DEP ARR button to go back to the DEP/ARR Index page, this time press the ARR button on the right.
Our arrival runway is 22 so select it and the available STARs will be filtered for that runway, pretty neat.
According to SimBrief we are using the MESSEN STAR so press NEXT PAGE until MESSEN is available and press the button next to it to select. The arrival should look like this:
Add Fuel
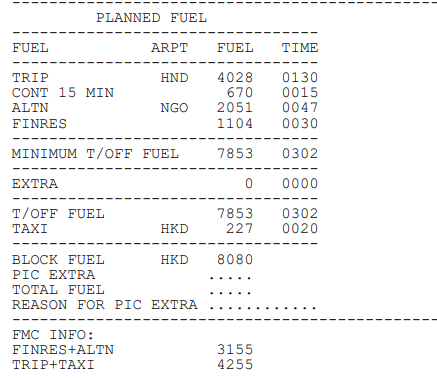
Look at the flight plan from SimBrief, the Summary and Fuel page will list our block fuel. Add or remove fuel - using the Weights and Balance widget in MSFS - to match this number, I usually take a little extra.
I also remove all fuel from the centre tank unless it’s a long haul flight and I need more fuel. If we use the centre tank we have to pressurize it and switch on the centre fuel pumps. Once the tank is empty we will see an EICAM warning message and the pumps need to be switched off to clear it. Since this is a short flight we can use only the left and right tanks.
Performance
With the fuel on board, we can input our flight performance values.
Press INIT REF to go to the PERF INIT page on the CDU. Press the button next to ZFW to show the number on the scratchpad then press again to input the value.
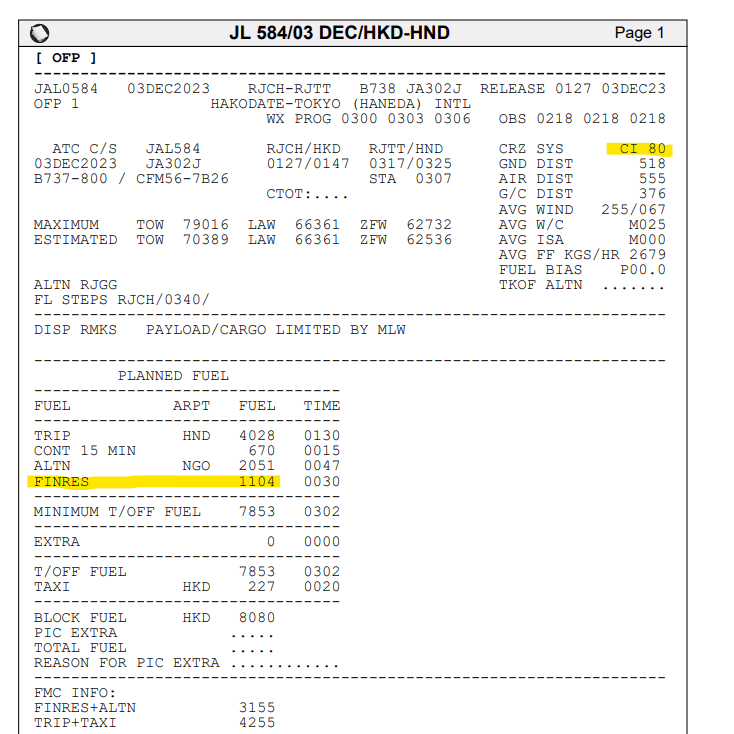
Get the RESERVES value from SimBrief and enter it by using the numpad next to the CDU. The reserve fuel is listed on the SimBrief plan as FINRES, and the fuel needed to reach the Alternate Airport is listed as ALTN. Add both together and that gives us the RESERVE value. You can find the number listed as FINRES + ALTN: today its 3155 so we can use 3.1 as our RESERVE value.
COST INDEX is entered the same way and is listed as CI.
The next part of the performance calculations are performed on the EFB.
Press PERFORMANCE and the take off screen should be displayed. First we copy the data from the FMC to automatically populate some of the fields. Do this by pressing COPY FMC DATA.
We now fill in the following sections to allow the EFB to calculate the take off data.
| EFB Data | ||
|---|---|---|
| Runway Condition | As Required | |
| Wind | From METAR | |
| OAT (Outside Air Temperature) | From METAR | |
| Thrust RTG (Rating) | OPTIMUM | |
| Flap Config | OPTIMUM | |
| AI (Anti Ice) | As needed |
A/I is the Anti Ice setting and since Ice is possible on my flight today I will set it to ENGINE. IF you don’t need it then set it to off.
With everything set, press CALC to finalize the takeoff setting then press SEND OUTPUT to transfer the data to the CDU.
Back to the CDU
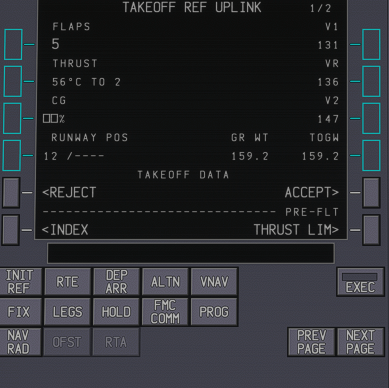
Press INIT REF » INDEX » TAKEOFF to go to the TAKEOFF REF UPLINK page.
Here we can press ACCEPT to finalize the Vref data.
Double press the CG button to complete the FMC Preflight.
Press LEGS on CDU then switch to PLAN mode on the MFD. Check the flight plane by pressing STEP. This will go through each leg individually. If there are any discontinuities then delete then by pressing the DEL key then pressing the button next to the discontinuity.
Overhead Panel Flow
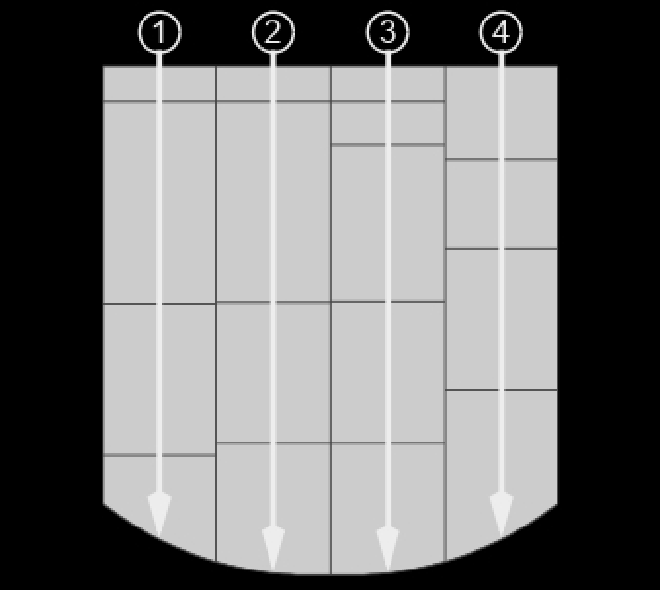
Beginning at the top left of the panel and working our way down the across. There are 4 panels so I will number them 1-4 for clarity. 1 being the leftmost and 4 being the furthest right.
| Panel 1 | |
|---|---|
| Flight Control Surfaces | Set and guarded |
| Heading Ref Switch | NORM |
| PRIMARY FLIGHT COMPUTERS | Guard Closed |
| BATTERY | ON |
| IFE PASS SEATS | ON |
| CABIN UTILITY | ON |
| APU GEN | ON |
| GEN CTRL | ON |
| DRIVE DISC | ON |
| Panel 2 | ||
|---|---|---|
| TOWING POWER | OFF | |
| FD FOOR POWER | ON | |
| CCR RESET | Guards Closed | |
| EMER LIGHTS | Guards Closed | |
| SERV INTPH | OFF | |
| PASS OXYGEN | DO NOT PRESS | |
| WINDOW HEAT | ON | |
| L, R ENG PRIMARY | ON (FAULT) Illuminated | |
| C1, C2 ELEC | OFF (FAULT) Illuminated | |
| L, R ELEC DEMAND | OFF (FAULT) Illuminated | |
| PASS SIGNS | AUTO | |
| LIGHTING PANEL | As Required |
| Panel 3 | ||
|---|---|---|
| GROUND TEST | NORM | |
| CARGO FIRE | Light Extinguished | |
| DISCH | Light Extinguished | |
| ENG EEC MODE | NORM | |
| START selectors | NORM | |
| NOZZLE | OFF (Light Extinguished) | |
| ARM | OFF (FAULT Light Extinguished) | |
| CROSSFEED | OFF (VALVE Light Extinguished) | |
| LEFT AFT | PRESS Extinguished if APU running | |
| L, R PUMPS | PRESS Illuminated | |
| CENTRE PUMPS | PRESS Light Extinguished | |
| BALANCE | OFF (No Lights) | |
| WING, ENGINES AI | AUTO | |
| BEACON | OFF | |
| NAV | As needed | |
| LOGO | As needed | |
| WING | As needed | |
| RUNWAY TURNOFF | OFF | |
| TAXI | OFF | |
| STROBE | OFF |
| Panel 4 | ||
|---|---|---|
| HUMID | ON | |
| CARGO TEMP | As needed | |
| EQUIP COOLING | AUTO | |
| RECIRC FANS | ON | |
| PACK SWITCHES | AUTO | |
| TRIM AIR | ON | |
| VENTILATION | NORM | |
| OUTFLOW | AUTO |
This completes the overhead flow. I will consolidate all the flows into a checklist and link it to this page in future.
Glare Shield Flow
Beginning on the left hand side and working right.

| EFIS Control Panel | ||
|---|---|---|
| MINS | BARO | |
| BAROSET | HPA | |
| - | Set Local Altimeter | |
| FPV | As needed | |
| MTRS | As needed | |
| WXR (Weather Radar) | OFF | |
| TFC (Traffic) | ON | |
| TERR (Terrain) | As needed | |
| FD | ON | |
| A/T ARM | ARM | |
| LNAV | ON | |
| VNAV | ON | |
| BANK LIMIT | AUTO | |
| HDG | Set to T/O runway heading | |
| ALTITUDE | Set to initial climb ALT |
Pedestal Flow
| Landing Gear | DOWN | |
| AUTOBRAKE | RTO (Rejected Take Off) | |
| Speed Brake | DOWN | |
| THRUST Levers | IDLE | |
| FLAP Lever | SET | |
| PARKING BRAKE | SET | |
| FUEL CONTROL SWITCHES | CUTOFF |
Pushback and Engine Start
Perform Before Start Checklist
Everything should be ready for us to begin pushback and start the engines.
| OverHead Panel | ||
|---|---|---|
| R ELEC DEMAND | AUTO | |
| C1, C2 ELEC | AUTO | |
| L ELEC DEMAND | AUTO | |
| L, R FUEL PUMPS | ON | |
| CENTRE PUMPS (IF Fuel in Centre Tank) | ON | |
| BEACON | ON | |
| SET Trim for take off | VERIFY GREEN BAND (See photo) | |
| PARKING BRAKE | Release | |
| ENGINE START SELECTORS | Start | |
| FUEL CONTROL SWITCHES | RUN |
After Engine Start / Before Taxi
After both engines start proceed with this flow and taxi to the runway.
| Before Taxi | ||
|---|---|---|
| APU Selector | Off | |
| FLAPS | Set for Take Off | |
| Flight Controls | Check | |
| Transponder | XPDR |
Perform Before Taxi Checklist
Takeoff
Perform Before Takeoff Checklist
When you are lined up and ready to
| Takeoff Procedure | ||
|---|---|---|
| Verify that the runway and runway entry point are correct. | ||
| Set the STROBE light switch to ON | ||
| When cleared for takeoff, set the LEFT and RIGHT LANDING light switches to ON. | ||
| (Option – GE engines) Advance the thrust levers to approximately 40% N1. | ||
| (Option – RR engines) Advance the thrust levers to approximately 20 TPR. Allow the engines to stabilize. | ||
| Push the TO/GA switch. Verify that the correct takeoff thrust is set | ||
| Maintain light forward pressure on the control column | ||
| Verify 80 knots | ||
| At VR, rotate toward 15° pitch attitude. | ||
| After liftoff, follow F/D commands | ||
| Establish a positive rate of climb | ||
| Set the landing gear lever to UP | ||
| Engage the autopilot when above the minimum altitude for autopilot engagement |
Perform the After Takeoff Checklist
Climb
If you have followed through from the beginning, well done, it was quite a lot of work! From now we will be climbing to cruise altitude. There is one last procedure to go through but it is very quick.
| Climb Procedure |
|---|
| At or above 10,000 feet, set the LANDING LIGHT Switches to OFF |
| Set the seatbelt signs as needed |
| Set baro to STD |
Everything is complete and we can sit back and enjoy the climb up to cruise altitude. Part Two of this tutorial will detail the procedures for the rest of the flight.